Tournament of Books: March Madness for the Classroom

Hello, friends!

It's Christmas break for me and I'm taking a few minutes to plan ahead for the new year!  Last year our first graders hosted a Tournament of Books and it was a huge success so we're getting ready to host one again this year!


The first thing I did was put up this huge bracket in the main hallway of our school.  It generated a ton of buzz around the school, especially before we shared any details about what we were actually planning!  The Brown Bag Teacher has bracket printables free on Teachers Pay Teachers.  They are perfect for getting your bracket ready.  To build the bracket, I started from the middle and worked out on each side, using black duct tape for the lines.  It wasn't a quick project, but it turned out perfectly!
13

10 Tips to Recharge Over Winter Break


Woohoo!  It's almost here!  As teachers, we give our all to our students and sometimes, we just need a minute to take a breath so we can bring our best every day.  Winter Break is the perfect time to get this must needed rest to recharge and come back in the new year refreshed and ready to go!  Here are 10 of my favorite ways to do just that.
6

Parent Presents, PART TWO


HI, Friends!! It's Erin, from Very Perry Classroom again!
 Last year, I shared what we made in my classroom for our parent presents from students.. Since I am teaching first grade right now, and have many of the same students this year as last year,  I needed to make something different. A lot has been going on, and I started to worry that we weren't going to finish our presents (or even DECIDE on what to make) in time! Then, I went to Michael's.... Which is dangerous for any crafty teacher in December, but, lo and behold, there was a SALE! :)
I found packs of six of this style of ornament for 50% off....
1

Using Sticky Notes for Interactive Read Alouds


Do you love sticky notes as much as I do?  I have them in every color, every size, lined, unlined, tabs and extra sticky.  You name it, I probably have a sticky note for you to use.  One of my favorite ways to use sticky notes is for Interactive Read Alouds.  Read on to learn how I use them and for a freebie!


Hey there, this is Paige from Our Elementary Lives and this is my FIRST blog post on the Primary
Punchbowl.  I just recently joined this fabulous group of ladies and couldn’t be more excited.  You can read more about me on my blog here!   

0

Writer's Workshop Story Starters

My little friends can spend an entire Writer's Workshop just thinking of story ideas. Does that happen to your class also? I am not a fan of staged writing prompts from the teacher, so getting them to pull from their own experiences can be difficult. That is why I send home a special letter at the beginning of the year. Read on to learn more and grab it for free!
Mrs Barnett First Grade

1

It's Our Birthday! {A Blog Hop and Giveaway!}


The Primary Punchbowl is celebrating our first birthday and we have a ton of fun in store for you!
21

Student Data Binders

Hey everyone!

I'm LOVING third grade so far. It's been an adjustment but let me tell ya, I made the correct choice when I switched not only grade levels but also districts. We are finishing the first quarter this week Thursday and have a four day weekend for Columbus Day. I'm excited for the weekend but sad to know a quarter of the year is already in the books.

With the switch of schools and districts a lot more has been placed in my lap. It's all been for the better. We are requiring the students to not only set their own goals but to track them. Each student in our school has their own DATA binder.

In my classroom, I have the students track their spelling tests, reading selection tests from our curriculum, Accelerated Reader tests, math facts and math tests. Yes, I realize that is a lot to track but we do certain ones on certain days. It only takes a few minutes each day for students to fill in their new data and color in their bar graphs.

0

A Class Pet Without the Mess!

Hey guys! It's Chynna from Primary Fairy Tales. I am so excited to be blogging over at the Primary Punchbowl today. This is my first post on the Punchbowl since I launched my very own blog, Primary Fairy Tales. I'm currently wrapping up my first month back in school and let me tell you... 
I am absolutely EXHAUSTED! I don't know about you but I can barely stay awake past 6 or 7. Thankfully fall break is only 8 school days away! (but who's counting?) Anyone else get a fall break? When is yours? 

1

Print Your Own Posters!


Hello, friends!  It's Elisabeth from Literacy and Lattes here with a fun bulletin board tip!
0

Teacher Hack!

Hi all! This is Chris from A Scoop of Learning sharing a teacher hack with you. I know there are TONS of teacher hacks all over the internet. Just like you, I have probably tried them all. Some turn out to be the greatest thing on earth and some not so much. However, I was just introduced to this latest hack that will make my life just a little easier this year.

A little background first, I have taught second grade for most of my career but moved down to first grade this year. I love it! The problem starts with these little humans being quite a bit smaller than the second graders I have been accustomed to. The fact that I'm also short does not help my problem, lol!

 The problem is this, when we take whole class assessments, they like to look at their neighbor's paper! What?! No way. Yes, yes they do. I know what you're going to say, just go order some privacy shields from a popular educational catalog (ahem). Well, I have those. They are big. Really big for my new tiny firsties. They would do the job just fine but they are big, bulky for firsties to handle and more difficult for me to see a group of students working quickly. Remember, this is the first time most of them are taking any type of whole group assessments, such as a spelling test. Therefore, I need to be able to walk around quickly during the test and see that they are even writing anything down:)

Here are the only two must-haves. Three pieces of standard sized tagboard and some packing tape.


I just taped the three pieces together like so. I did tape on both sides just to be extra sturdy.


Now this next part is only if you're a 'little' Type A, like myself:) I used my paper cutter to trim each side of the end pieces just a little. By doing this, they seem to fold a little better.


Last, if you don't have any restrictions on your school's lamination, you may even want to laminate them to withstand quite a few years. Luckily, I was be able to feed two of them through at once:)


Now, let's compare these 'home-made' privacy shields against the popular name brand. Just so you know, there are the SAME number of privacy shields for both types shown below.


Clearly, they take up MUCH less space. They are light enough that even my firsties can pass them out {perk!}, and they are short enough that I can see over them to do quick checks on progress as I walk by. The store bought privacy shields can be cumbersome for these littles to maneuver on their desktop. Trust me, I tried. They were constantly getting pushed off during assessments. These are small enough that they will stand on top of their desks and still give the students plenty of room to work. Win, win!

Now, here's the bonus...my new teaching partner has had her privacy shields for over 10 years and they are still going strong! Isn't that amazing?!

I would love to hear about some of your teacher hacks! Tell me your favorites in the comments below. Have a great Back-to-School season, friends!

Chris

0

5 Easy Name Activities for Back to School

Hey!  It's Andrea from Always Kindergarten.  I hope your school year is off to an amazing start!  This time of year is always so much work and teachers are exhausted at the end of each day.  This makes finding the energy to plan and prep really hard.  I like to keep the activities simple and the prep to a minimum both for me and my students.  Since we tend to focus a lot on names at the beginning of Kindergarten, I've put together 5 ideas for working on names that are low prep and a lot of fun!

At the beginning of the year, I write students' names on sentence strips.  We use these for so many different activities.  A fun community building activity is to have students find a friend who has one, two, or even three of the same letters in their name as they do.  They love to look for similarities and differences in their names.  We also find a friend with more letters, less letters, or the same number of letters in their name.  It's great to get the kids talking and to learn each other's names in those first couple of weeks.

Some of our favorite tools to use for names (and word building) are letter tiles and magnetic letters.  Students practice building their own names as well as the names of their friends.  

Another great tool for strengthening fine motor and working on names are Wikki Stix!  I have a love/hate relationship with Playdoh and sometimes, I just need a break from the mess it makes.  Wikki Stix are a great alternative and the kiddos love bending and twisting them into the letters of their names.

Bean names, a classic activity!  I write students names on construction paper with a pencil and then they glue on pinto beans.  It's quick to prep and is fantastic for strengthening fine motor.  

This is definitely one of my favorite name activities for the beginning of the year!  We learn how to use watercolor paints to create name art!  I write the students' names with a black sharpie and students paint inside the letters.  It makes a beautiful bulletin board that you can keep up all year!


What are your favorite name activities?  Let me know in the comments below!


This post contains affiliate links for Amazon.  By purchasing an item on the Amazon site using these links, I will receive a small commission on your purchase.


0

Wonderland classroom decor and themes on a budget

Hi, there! I am Erin, from Very Perry Classroom coming to you on my third week of Kinder Camp! Third week?! Some people in the U.S. are still in school! I can't believe I am on day 10/16 tomorrow! Where did the time go? I don't know about you, but I am enjoying every spare moment I have had so far this summer break, and it feels so good!

As I shared last week on our linky, I am moving to first grade! With the grade change, I have decided it was time to change my classroom decor. SO, I am moving away from "The Mouse " (Or the "Mice," rather), and going in another direction... A more colorful direction... towards Wonderland!!

I know so many of you have seen the AMAZING classroom that Hope King of Elementary Shenanigans has at Ron Clark Academy. Beautiful, beautiful work that I can only drool over... Seriously, check it out and prepare to dream and/or drool...  I did want a lot of the whimsy and color from the Disney version of the story, since I will still be in primary... SO, taking some of the concepts from both versions, I think I have an idea in mind! I can't wait to share more in August, when it is complete.

In the meantime, I wanted to share some of the ways I will affordably be creating decor for my classroom!
When looking for a new classroom theme or design, Pinterest is your B.F.F. I mean, where else can you have a giant resource of ideas at your fingertips? For example, I wanted to find ways to use playing cards in my classroom design, and voila! Look at this adorable idea for a garland from Love to Crop!
I just need to head to Dollar Tree for some playing cards (2 packs for $1), or order some giant ones (About $6) from Amazon!

Another thing I am dying to incorporate is the White Rabbit... That little guy always seems to be in a hurry, and I can totally relate! :)
I found this cute image online at Learning in Wonderland, and can't to create my own similar version, using my Cricut dies. Should only cost about $2 in paper!


I have had a clock with Mickey ears for a few years now (see below), and I am ready to create a Wonderland clock!

One of my favorite scenes in the classic story is when Alice is in the garden with the flowers. I think buying a few of these large flower-shaped pinwheels from Dollar Tree ($1 each) and adding faces would help create a Wonderland atmosphere. 


Finally, I am in love with the "Follow Directions" and "Looking Forward" posters from Eureka Schools
($5.49)
($2.99)


I can't wait to fully share how my vision comes together! What theme(s) are you using/have you used in your classroom?


3

We're Mixing the Punchbowl!


Hi!  It's Elisabeth from Literacy and Lattes starting off summer by sharing some exciting things happening here at The Primary Punchbowl!  So many of the bloggers behind the Punchbowl are mixing it up and moving to new jobs!  We wanted to share our changes with you...and maybe solicit some advice, too!


For the last 5 years, I've been teaching Reading Recovery (an intensive one-on-one reading intervention) in the mornings and literacy block, science and social studies in a first grade classroom in the afternoons.  It's the best of both worlds.  One-on-one and classroom.  But my true passion lies in helping struggling readers find success so when the opportunity to move into the Reading Room full time, I knew it was time to take the leap!  So I'm moving to another school in my district and taking a step out of the classroom.  I'm so excited, but it's also bittersweet to leave my school and the families that I have worked with over the past years.  


Even in the very beginning of first grade, some of my sweet little reading kiddos come to me with a sense of failure already on their shoulders.  Taking those little first graders and giving them a feeling of success?  There's no better feeling in the world.  Honestly, my job is seriously amazing.  I do think I'll miss having my own classroom of kiddos, but for real...opening the world of reading to a little learner?  Pure magic.  
So in my new job, I'll still be working with four Reading Recovery students one-on-one.  I'll also be "pushing in" to other teachers' classrooms and working with four small groups of primarily first grade students.  


I'll be working on a cart for half the day, so I'm working on an organization system to keep supplies easily accessible and ready to use! Since I'm teaching Leveled Literacy Intervention (aka LLI) most of my supplies are already pretty compact, so that's a big bonus right off the bat!

That brings me to the advice I'm looking for...
In my 11 classroom years, I never had another teacher truly push in to my room.  I've worked with tons of awesome teachers who pulled students out from my room, but that's a whole different story.  So...tell me in the comments: Do you have a teacher who provides services in your classroom?  What works for you?  What makes you totally crazy?  

Check out the other members of The Primary Punchbowl who are moving to new positions!
Are you moving, too?  Feel free to join us and link up to share about your new position!

Happy summer!


3

Using Google Drawings in the Primary Classroom

Hi guys! It's Jessica from Pride and Primary! I'm here to show you some ways to use Google Drawings in the classroom, as well as a quick crash course!
Here are some examples of how I use this versatile Google App!


So let's get started!

First, go to drawings.google.com. 

Here's what you see!
 Learn the toolbar real quick.


After you insert a line, a new toolbar shows up.
 Make your choices and then go to insert a text box.

After you insert a textbox, a new toolbar shows up. The Line toolbar is also there in case you want to add a line around your text box.

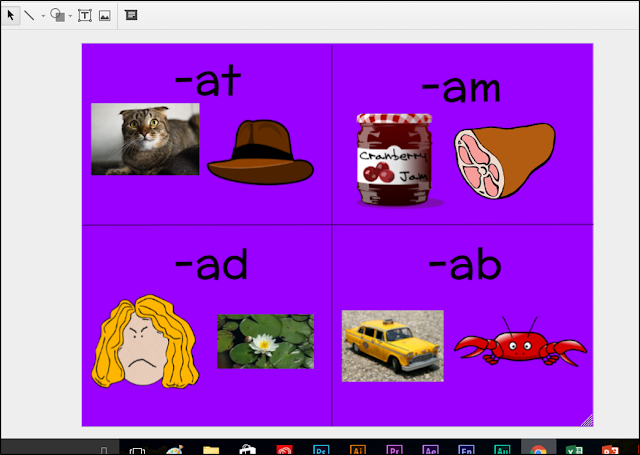
Insert the text you want and drag it to the places you want. I am making a short a sort, so I chose 4 word family endings and moved them to the four boxes I made. Then click on Tools and Research. The Research Tool opens on the right of the screen. Click in the search bar and a drop down menu appears.

Choose Images and type what you would like to find. I am looking for short a words with the endings I chose. Some pictures I want are cat, hat, ram, crab, mad, etc. I also want to make sure I can use the pictures safely so click on the little arrow under the search bar. ​


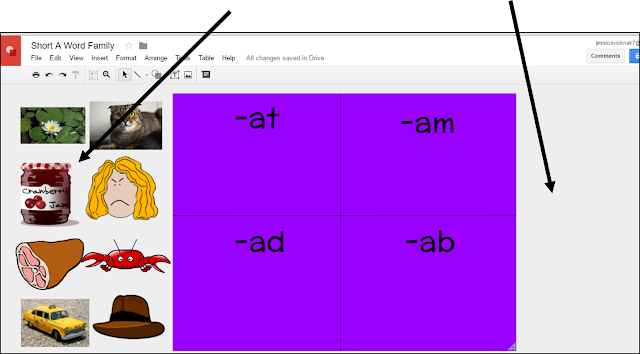
When you have the pictures you want, you can press the little x on the research tool to hide it. Here is my Short A Sort. But I’m not finished yet! I have to move the pictures off the canvas to the side so the kids will be able to sort them properly.
I drag the pictures off the canvas to the side. Now it’s almost ready for the students. I like to add another text box with directions off to the other side so they know what to do. ​

I also add a text box in the middle so they have a place to type their name. ​
So simple: Insert text box, choose white as the fill background color. Type “Type Name Here” or what you wish. Choose the font and size and alignment, if you wish. ​
You can add how you want the students to turn in their work, or email it to you.​

Now it’s time for you to share it with your students. This is very important. Click on SHARE. The Share menu pops up. Click on Get shareable link.​

Click the little arrow next to Anyone with the link can view. Here you can choose how to share the file. Now, you don’t want each student working on the same file because they would all edit the same one. You want each kid to have his or her own file to work on. ​

So I leave it on “Anyone with the link can view” and click copy link. Pass the link to your students (however you do that). The students then open the link, click on File and choose Make a Copy. Each student will have his own copy. ​

So there you go! That's how you work Google Drawings. It's such a versatile tool and there is a plethora of possibilities! Have fun exploring and please send me pictures of your fabulous work! 

Here are links to some of my drawings activities: 

If you would like to share any files with me, please email to prideandprimaryblog@gmail.com. 

Happy Teaching! 

Jessica
0
Powered by Blogger.